

How To Make A Wall Move Down In Unity Without Animation
Position GameObjects
To modify the Transform component of the GameObject The fundamental object in Unity scenes, which can represent characters, props, scenery, cameras, waypoints, and more. A GameObject'south functionality is defined by the Components fastened to it. More info
Encounter in Glossary , utilize the mouse to dispense whatever Gizmo A graphic overlay associated with a GameObject in a Scene, and displayed in the Scene View. Congenital-in scene tools such as the move tool are Gizmos, and you tin can create custom Gizmos using textures or scripting. Some Gizmos are simply drawn when the GameObject is selected, while other Gizmos are drawn by the Editor regardless of which GameObjects are selected. More info
See in Glossary axis, or blazon values directly into the number fields of the Transform component in the Inspector A Unity window that displays information about the currently selected GameObject, asset or project settings, allowing y'all to audit and edit the values. More than info
Encounter in Glossary .
Alternatively, yous tin can select each of the five Transform modes from the Scene A Scene contains the environments and menus of your game. Remember of each unique Scene file as a unique level. In each Scene, yous place your environments, obstacles, and decorations, substantially designing and edifice your game in pieces. More info
Run across in Glossary view'southward Tools Overlay or with a hotkey:
- W for Move
- E for Rotate
- R for Calibration
- T for RectTransform
- Y for Transform
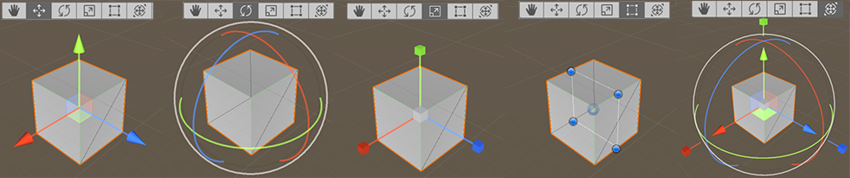
Move
At the heart of the Move Gizmo, there are iii small squares you can use to elevate the GameObject within a single plane (meaning yous can move ii axes at once while the third keeps all the same).
If you concur shift while clicking and dragging in the heart of the Move Gizmo, the middle of the Gizmo changes to a flat square. The flat square indicates that you lot tin can move the GameObject around on a plane relative to the direction the Scene view An interactive view into the globe you are creating. You use the Scene View to select and position scenery, characters, cameras, lights, and all other types of Game Object. More info
See in Glossary Camera A component which creates an paradigm of a particular viewpoint in your scene. The output is either fatigued to the screen or captured as a texture. More info
See in Glossary is facing.
Rotate
With the Rotate tool selected, modify the GameObject'south rotation past clicking and dragging the axes of the wireframe sphere Gizmo that appears around it. As with the Movement Gizmo, the final centrality you changed will be colored yellow. Recall of the red, green and blue circles as performing rotation around the red, light-green and blueish axes that announced in the Motion way (red is the 10-axis, light-green in the y-centrality, and bluish is the z-axis). Finally, use the outermost circumvolve to rotate the GameObject around the Scene view z-axis. Remember of this as rotating in screen space.
Scale
The Scale tool lets y'all rescale the GameObject evenly on all axes at once by clicking and dragging on the cube at the center of the Gizmo. Yous can as well calibration the axes individually, merely you should accept care if you do this when there are child GameObjects, because the consequence tin can await quite strange.
RectTransform
The RectTransform is commonly used for positioning 2D elements such as Sprites A 2d graphic objects. If you are used to working in 3D, Sprites are essentially just standard textures only at that place are special techniques for combining and managing sprite textures for efficiency and convenience during development. More info
See in Glossary or UI elements, but it can also exist useful for manipulating 3D GameObjects. It combines moving, scaling and rotation into a unmarried Gizmo:
- Click and elevate inside the rectangular Gizmo to movement the GameObject.
- Click and drag whatever corner or edge of the rectangular Gizmo to scale the GameObject.
- Elevate an edge to scale the GameObject along one centrality.
- Drag a corner to scale the GameObject on 2 axes.
- To rotate the GameObject, position your cursor just beyond a corner of the rectangle. The cursor changes to display a rotation icon. Click and drag from this area to rotate the GameObject.
Note that in 2d mode, you can't alter the z-axis in the Scene using the Gizmos. However, it is useful for certain scripting techniques to use the z-centrality for other purposes, so you can still set the z-axis using the Transform component in the Inspector.
For more than information on transforming GameObjects, come across documentation on the Transform ComponentA Transform component determines the Position, Rotation, and Scale of each object in the scene. Every GameObject has a Transform. More than info
Encounter in Glossary .
Transform
The Transform tool combines the Motion, Rotate and Scale tools. Its Gizmo provides handles for movement and rotation. When the Tool Handle Rotation is set to Local (see below), the Transform tool also provides handles for scaling the selected GameObject.
Custom tools
If your Project uses custom Editor tools, some of them might also allow you to position GameObjects.
You lot can access custom tools from the Editor Tools dropdown carte du jour in the Scene view Tools toolbar A row of buttons and basic controls at the top of the Unity Editor that allows you to interact with the Editor in diverse ways (east.g. scaling, translation). More info
Come across in Glossary Overlay.

For data, see the documentation on Using Custom Editor Tools.
Gizmo handle position toggles
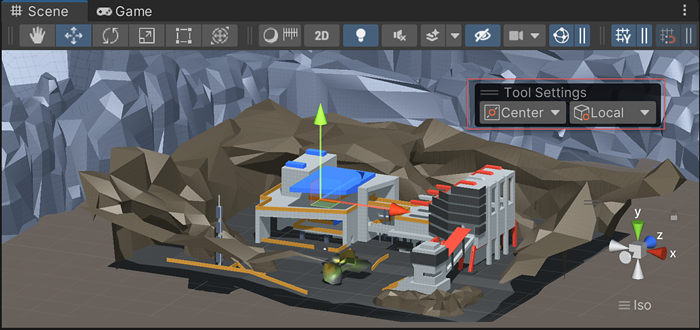
The Gizmo handle position toggles found in the Tool Settings Overlay are used to ascertain the location of whatever Transform tool Gizmo, and the handles used to dispense the Gizmo itself.
For position
Use the dropdown carte du jour to switch between Pivot and Middle.
- Pin positions the Gizmo at the actual pivot point of the GameObject, as defined by the Transform component.
- Center positions the Gizmo at a center position based on the selected GameObjects.
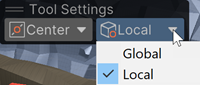
For rotation
Utilise the dropdown menu to switch between Local and Global.
- Local keeps the Gizmo's rotation relative to the GameObject'due south.
- Global clamps the Gizmo to world space orientation.
Snapping
Unity provides 3 types of snapping:
- World grid snapping: Snap a GameObject to a grid projected along the 10, Y, or Z axes or transform a GameObject in increments along the X, Y, or Z axes. This is only available while using the World, or Global, handle orientation.
- Surface snapping: Snap the GameObject to the intersection of any Collider An invisible shape that is used to handle physical collisions for an object. A collider doesn't need to be exactly the same shape every bit the object's mesh - a rough approximation is often more efficient and indistinguishable in gameplay. More than info
See in Glossary . - Vertex snapping: Snap whatsoever vertex from a given Mesh The main graphics primitive of Unity. Meshes make upwards a big part of your 3D worlds. Unity supports triangulated or Quadrangulated polygon meshes. Nurbs, Nurms, Subdiv surfaces must be converted to polygons. More info
Encounter in Glossary to the position of another Mesh'southward vertex or surface. You lot tin snap vertex to vertex, vertex to surface, and pivot to vertex.
Surface snapping
While dragging in the middle using the Move tool, concur Shift and Control (Command on Mac) to speedily snap the GameObject to the intersection of any Collider.
Vertex snapping
Employ vertex snapping to quickly assemble your Scenes: take whatsoever vertex from a given Mesh and place that vertex in the aforementioned position as any vertex from any other Mesh you choose. For example, utilize vertex snapping to align road sections precisely in a racing game, or to position power-up items at the vertices of a Mesh.
Follow the steps beneath to utilise vertex snapping:
-
Select the Mesh you want to manipulate and make sure the Movement tool is active.
-
Press and hold the Five fundamental to activate the vertex snapping mode.
-
Move your cursor over the vertex on your Mesh that you desire to use as the pivot point.
-
Hold downwardly the left mouse button once your cursor is over the vertex you desire and drag your Mesh adjacent to any other vertex on another Mesh.
To snap a vertex to a surface on another Mesh, add and hold down the Shift+Ctrl (Windows) or Shift+Command (macOS) key while you move over the surface you want to snap to.
To snap the pivot to a vertex on some other Mesh, add and concord the Ctrl (Windows) or Control (macOS) central while y'all movement the cursor to the vertex you want to snap to.
-
Release the mouse button and the V key when you are happy with the results (Shift+V acts as a toggle of this functionality).
Look-at rotation
While using the Rotate tool, concord Shift and Control (Command on Mac) to rotate the GameObject towards a point on the surface of whatever Collider.
Screen Space Transform
While using the Transform tool, hold downwardly the Shift key to enable Screen Space mode. This mode allows you to motion, rotate and scale GameObjects every bit they appear on the screen, rather than in the Scene.
- Transform tool added in 2017.3 NewIn20173
- Selection Outline for child GameObjects added in 2018.iii NewIn20183
- Button and menu to admission custom Editor tools added in 2019.1 NewIn20191
- Native grid added in 2019.iii NewIn20193
- Gizmo handles moved to Tool Settings Overlays in 2021.2 NewIn20212
Source: https://docs.unity3d.com/Manual/PositioningGameObjects.html
Posted by: darcystento.blogspot.com
0 Response to "How To Make A Wall Move Down In Unity Without Animation"
Post a Comment